Saving the claim
Once all the details have been added press the Save icon in the top right-hand corner (as shown)

If you don’t have all the information necessary to complete the CNF, press the Save function to retain the details entered and return to the claim later on.
Printing a draft claim
You can print off a draft CNF, once mandatory data has been entered.
To bring up the Print CNF button, click on the Claim Actions button (as shown below) at the bottom left of the page

This will open a pop-up with several options available to you, one of which will be “Print CNF” (as shown below)

If you click on Print CNF and insufficient details have been entered, error messages will tell you which fields must be entered for a draft to be printed (see below).

If all required fields have been provided, the document will go into the section called Printable Documents, which is located at the top right of the page. The Printable Documents button is a printer icon as shown below.

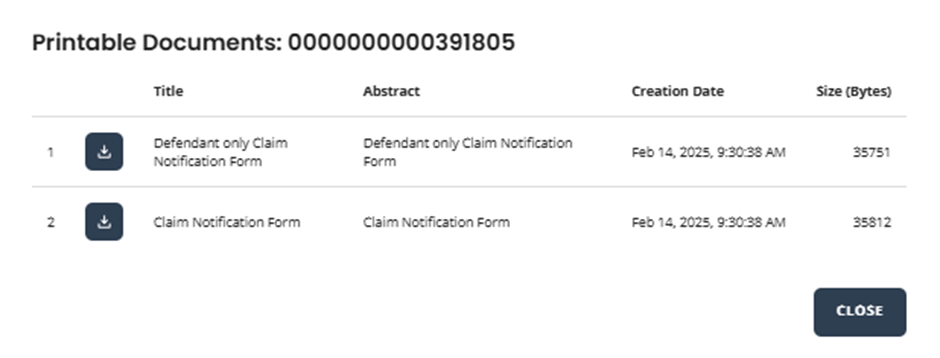
Clicking on the printer icon will open a pop-up that lists all the Printable Documents for that claim as shown below, including the CNF, number 2 below. Clicking on the download icon, will open the relevant document as a PDF which you can print off (or save) as necessary.
For EL/PL claims where the Compensator is not known, a draft CNF can be printed and posted to the defendant. The claim will remain in the portal. Once the defendant has responded, you can select the Compensator and send the CNF.
Submitting a claim
Once you've completed all the fields, click Send. If mandatory fields have not been completed the system will highlight these in red and you will need to be complete these fields in order to send the claim. Check each of the tabs to find the missing fields.
Notification date
For EL / PL claims when you press the send button a notification screen (as below) will appear.

The protocol allows you, under certain circumstances, to send a draft CNF to the defendant by post. Once you have the missing information, you can update the CNF and send it in the portal. At this point, the Notification date can be overridden. The Notification date should be entered as the date the draft CNF was posted. Validation rules are in place to minimise the risk of inappropriate Notification dates. The oldest possible date that is allowed is 29 working days in the past. Please refer back to section 6.10 of the Pre-Action Protocol for Low-Value Personal Injury (Employers’ Liability and Public Liability) Claims.
For RTA claims, the Notification date will automatically be set to the day you send the CNF and cannot be amended.
Download and printing
After sending a CNF you will be presented with the screen below:
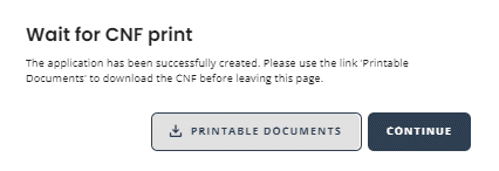
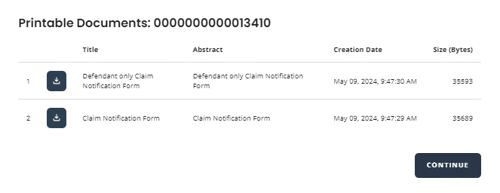
Select 'Printable documents' to download, save and print the PDF versions of the CNF and the Defendant-only CNF using the function Printable Documents.
Then click Continue which will re-display your worklist with the notifications as shown below. Areas highlighted in green refer to the Compensator User profiles that can respond to your claim.
Printing a claim once submitted
Once a claim has been ‘sent’ in order to find and print it you will need to search for it by taking the following steps:
- Click on the search tab
- Type the claim number in the ‘Application ID’ tab as seen below – then select the ‘search’ button
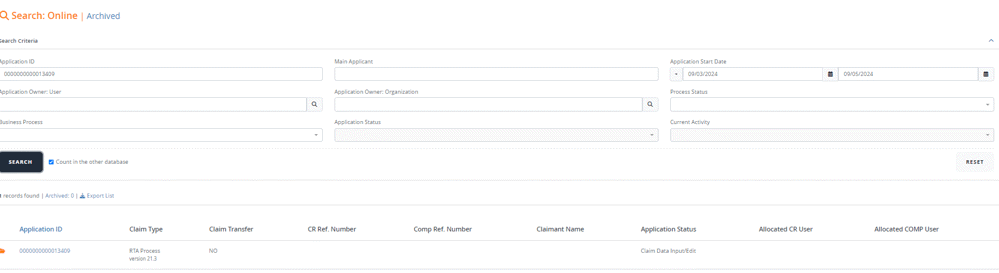
The result will then generate a read-only view as seen above.
You will need to highlight and select the ‘printable documents’ icon, as shown below:

This will lead you to the following page as seen below.

Top tip: It is important that you print and/or download the documents as the claim progresses. Once the claim has ended in the Portal, it will be removed after a period (currently 30 days), and the documents will no longer be available to you.